With the heavy wear and tear of spring fieldwork fast approaching, pre-season inspections can help prevent and minimize downtime during the season. This article includes checklists, procedures, and parameters for completing the maintenance required for smooth operation. Check the operator’s manual for all additional information and step-by-step instructions on all your maintenance needs.
Before completing any maintenance place all controls in neutral, stop the engine, set the parking brake, remove the ignition key, and wait for all moving parts to stop before dismounting.
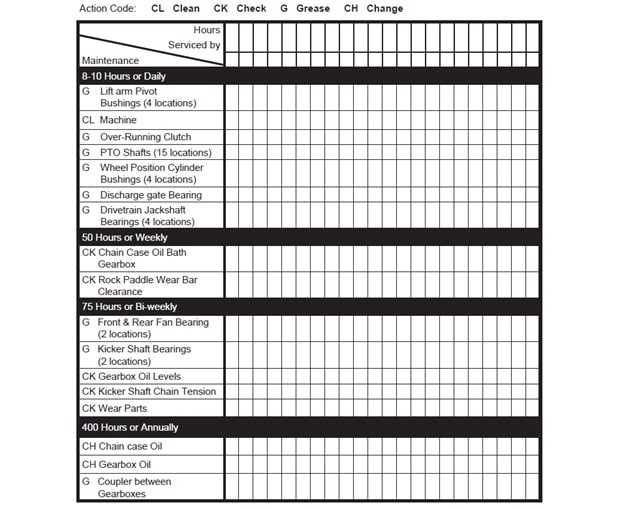
Wolverine Ditcher Service Record
Fluids & Liquids you may need:
- Grease: Use SAE multi-purpose high-temperature grease with extreme pressure (EP) performance
- Gearbox Oil: Use Schaeffer’s Supreme One for All Gear Lubricant SAE 80W-140
- Outer Gearbox Cap: 9.5 litres (10.0 US qt.).
- Inner Gearbox Cap: 11.0 litre (11.7 US qt.).
- Chain Drive Oil Bath: Use an SAE 80W-140 synthetic gear oil for all operating conditions
o Capacity: 1.5 litres (1.6 US qt.).
- Use clean lubricants and clean containers.
Greasing
- Wipe grease fittings with a clean cloth before greasing to avoid injecting dirt and grit
- Replace or repair broken fittings
- If fitting does not take grease, remove it, and clean thoroughly.
Daily Greasing Intervals:
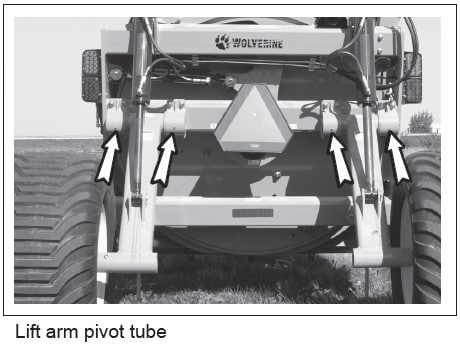
Lift Arms:
- Grease the lift arm pivot bushings until grease comes out of the ends. Add at least four pumps of grease or until clean grease comes out of the bear housing.
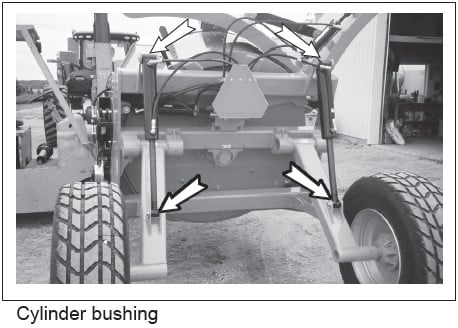
Lift Cylinders:
- Grease the lift cylinder bushings. Add at least four pumps of grease or until clean grease comes out of the hydraulic pivot tubes.
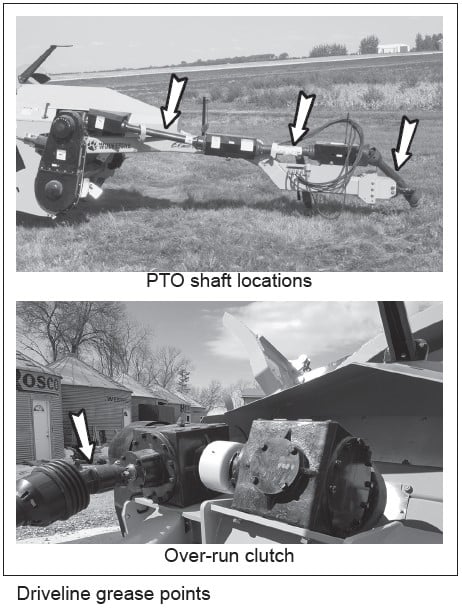
PTO Shafts:
- Grease the driveline PTO shafts with two pumps for cross, two pumps for each Guard Bushing and eight pumps for the telescoping section.
- Rotate driveline as required to move zerk pointing outward.
Discharge Gate:
- Grease discharge gate. Add four pumps of grease to the first location, cycle gate and add four pumps to the second location.

Drivetrain jackshafts:
- Grease drivetrain jackshaft bearings (four locations) and add only two pumps.

Bi-Weekly Greasing Intervals:
Front & Rear Fan Bearings
- Grease front and rear fan bearings with two pumps of grease.

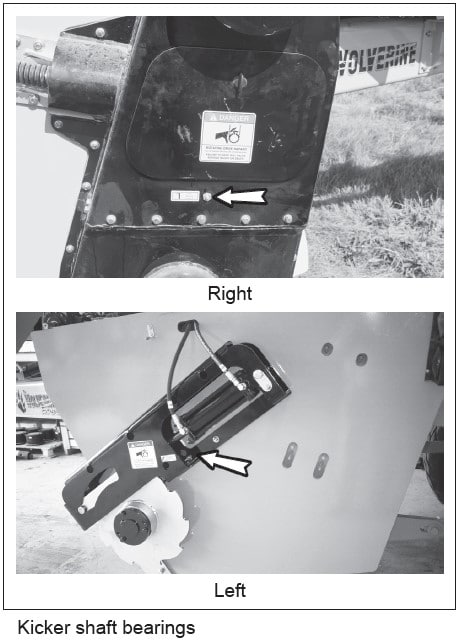
Kicker Shaft Bearings
- Grease kicker shaft bearings with two pumps of grease.
Annual Grease Interval
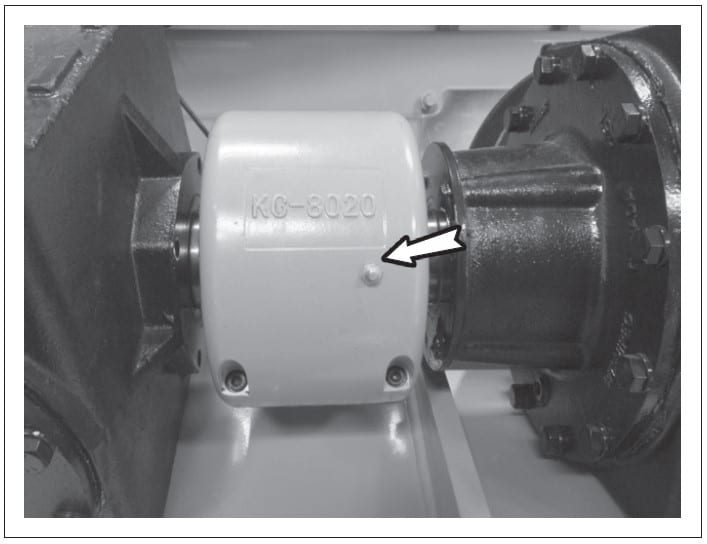
Chain Coupler
- Grease coupler between gearboxes with ten pumps of grease. If any grease leaks out or there are any signs of seal damage, remove the cover, repack with grease, and reseal.
Wolverine Ditcher Pre-season Checklist:
- Check the oil level in the chaincase.
- Change the gearbox oil after the first 50hrs of use.
- Check the fan paddle and wear bar clearance to the fan wear liner.
- Inspect intake wear parts and liners.
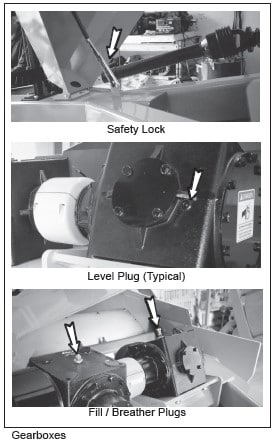
- Check the gearbox oil level, the oil level should be halfway up the box, and the oil level should fill just threads in the level plug.
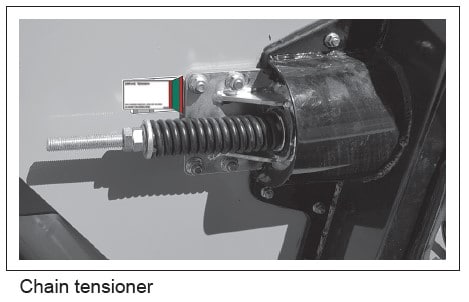
- Check tension of kicker shaft drive chain. The spring tension washer should be in the green zone on the spring tension sticker or compress the spring to about 6 inches.
Wolverine Ditcher Annual Maintenance
- Change the oil in the chaincase.
- Change the oil in the gearboxes.
Gearbox Maintenance:
The Wolverine’s gearboxes provide power to the fan and kicker shaft chain. Change the oil and clean the breather every year, or 400 hours*. When maintaining the gearbox, follow these procedures:
Changing oil:
- Remove the fill/breather and level plugs.
- Use a suction pump to remove the oil from each gearbox.
- Add Schaeffer’s Supreme One For All Gear Lubricant SAE 80W-140.
- Outer Gearbox Cap: 9.5 litres (10.0 US qt.).
- Inner Gearbox Cap: 11.0 litres (11.7 US qt.).
- Use the level plug or look through the top to ensure the oil level is correct.
- Install and tighten fill/breather and level plugs
- Dispose of used oil in an environmentally safe manner.
Clean the Breather:
Each gearbox is equipped with a breather in the fill plug to equalize the internal pressure to the atmosphere and prevent leaks. Clean the breather when changing the oil.
- Remove the fill plug/breather.
- Check that the vent passage through the plug is open.
- Soak in a solvent if plugged.
- Use a high-pressure air hose or probe to clear the passage.
- Install and tighten the breather plug.
Wolverine Ditcher – Wear Items Checklist
- Rock Paddles & Edges
- Intake Wear Parts
- Cutting Blades
- Ripper Fingers
- Outer Kicker Shaft Paddles
- Kicker Shaft Paddles
- Side Cutting Blades
- Wear Liners
- Fan Liner
- Gate Liner
- Chute Liner
Rock Paddles & Edges
The fan has adjustable wear bars at the end of the paddles. They can be adjusted to maintain the proper clearance between the paddles and the frame. The best performance is when the clearance gap is 3-6 mm (1/8-1/4 inch). Check the clearance gap weekly or when power requirements increase. To check or adjust the wear bars, follow this procedure:
- Loosen anchor bolts or the wear bar.
- Slide or tap the wear bar into the desired position.
- Tighten anchor bolts.
- Manually turn the fan through 360° (paddle moves downward) and check for interference.
- If contact can be heard, move the wear bar back slightly. Turn again.
- Repeat with other paddles.
- Tighten all fasteners.

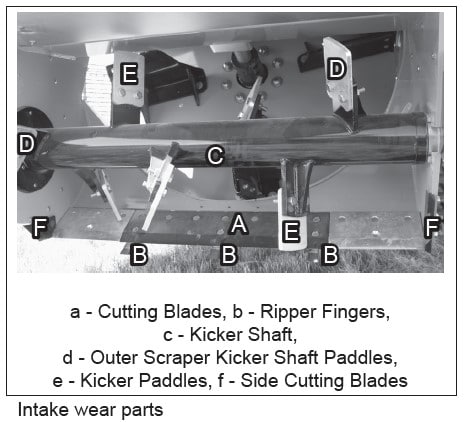
Intake Wear Parts
The kicker shaft paddles and cutting blades can be changed when worn. Inspect weekly and replace with genuine Elmer’s parts when wear exceeds the limits stated below: Replace the paddles or ripper fingers when they have worn down 25 mm (1 inch). Check the operator’s manual before completing any maintenance.
- This component on the front of the frame cuts through the soil and directs it toward the fan. When the leading edge wears off, replace the cutting blades.
- These components mount to the bottom of the center cutting blade, breaking up the hardpan and soil in front of the machine.
- The two outer kicker shaft paddles sweep and clean the material from the sides of the intake and move it towards the center of the fan.
- The paddles on the kicker shaft move the material into the fan.
- The intake area is designed with a cutting blade on each side to provide a clean cut through the soil.
Intake Wear Part Replacement Procedure
The kicker shaft and intake are designed with replaceable components to allow the operator to change them when they wear. To install or change the parts, follow this procedure:
- Raise the frame fully up and install the frame safety locks.
- Clear the area of bystanders.
- Place all controls in neutral, stop the engine, set the parking brake, remove the ignition key, and wait for all moving parts to stop before dismounting.
- Remove the bolts on the wore wear parts in a manner that ensures they will not fall on you.
- Remove paddles and replace them.
- Install mounting or plow bolts and tighten them to their specified torque.
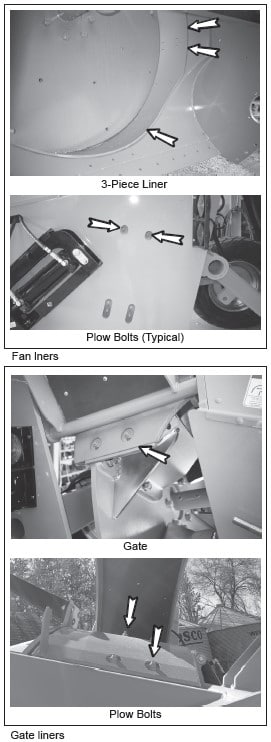
Wear Liners
The fan is designed with replaceable wear liners to protect the frame. Check the Fan and Gate liner as you check your kicker shaft and inlet wear parts. Replace the liner when any part of the liner is less than 3 mm (1/8 inch) thick or when it affects the frame or heads of the plow bolts.
Fan Liner:
The fan housing has a 3-piece liner that allows for easy replacement.
Gate Liner:
The gate forms the upper portion of the fan housing and has a replaceable liner attached with plow bolts.
Chute Liners:
Both chutes are designed with replaceable liners to prevent damage to the chute frames.

Wear Liner Replacement Procedure
All Ditcher components that contact the soil will wear as soil material moves through the machine. Inspect the machine regularly and replace worn parts. When the liner surface is less than 3 mm (1/8 inch) thick, follow this procedure when replacing worn parts:
- Clear the area of bystanders.
- Use the chute-hydraulic circuit to configure the chutes or gate into the required position.
- Place all controls in neutral, stop the engine, set the parking brake, remove the ignition key, and wait for all moving parts to stop before dismounting.
- Install frame safety locks.
- Remove fasteners securing wear components to frame or chutes.
- Replace liners with genuine Elmer’s liners.
Secure liners with new fasteners and tighten all fasteners to their specified torque.
The Wolverine Ditcher has become an increasingly popular implement for water management. It allows for the ability to either create new or clean existing waterways helping improve yield and allowing the producer to get onto their fields sooner. Before completing any maintenance, consult the operator’s Manual.
Stay Updated
Recent Events & News
May 07, 2026
Elmer’s Manufacturing Announces Riesterer & Schnell as Authorized Dealer
Elmer’s Mfg signs on Riesterer & Schnell as new dealer in WI.…
Apr 27, 2026
Super7 V2026.1.3 Release Notes
What’s new Fixes and improvements…
Apr 16, 2026
Connect V2026.1.0 Release Notes
Connect V2026.1.0 Release notes New & Improved Features, Bug Fixes.…